Despite everything that’s been written on the proper way to make dry pack mortar, there still seems to be a great deal of uncertainty on the part of weekend warriors, and even a few pros have trouble with the concept. I have therefore taken a few pictures of the mud I make, and I will explain the process once again. Maybe these pictures will be a little clearer than those previously published. Included in this article are thumbnail photos, and if you click them you’ll be taken to the full-size versions.
To begin with, I’ll describe deck mud, which is also called dry pack mortar or floor mud. In other English speaking countries it might be called “screed.”

Deck mud is made with clean sand, portland cement and water. That’s it. Don’t consider adding anything else. The basic recipe is 5 parts sand to 1 part portland cement — 5:1. Some professionals prefer a richer mix of 4:1, but I’ve found that ratio hard to mix and spread. Too much cement and the mortar tends to clump as you mix it. Other pros advocate a 6:1 or even a 7:1 recipe. I think 5:1 can be considered the median of the industry. I think it’s ideal. Richer or leaner mixes do the job, though, so don’t panic if your mud is not “ideal.”
It has been suggested that deck mud should be mixed with latex additive instead of water, this to make the mortar more cohesive and to give it greater compressive strength. Well, I’m here to tell you that mortar made from sand, cement and water can easily attain a compressive strength of 3,000 psi or better. That strength is more than adequate for shower floors and other small areas. Adding latex in this instance is simply a waste of time and money.
The best sand to use is clean “sharp sand.” Sharp sand is crushed stone. It might also be called concrete sand or torpedo sand. It is much courser than masonry sand, but masonry sand can also be used.
Portland cement is the universal name for construction cement. It comes in 94 lb. sacks and is available at almost all building supply stores, many hardware stores, big box home centers and most sand yards. This is the cement to use for deck mud. Do not consider “masonry cement,” which contains lime.
There are pre-mixed mortar products that contain only sand and portland, and these can be used to make deck mud. Most of them will have to be thinned down just a bit by adding additional sand, as the cement content of the pre-mixes is too high (about 3:1, usually). One popular product is Sand Topping Mix. You can find Sand Topping Mix at Home Depot. I use it frequently for small jobs like single shower floors. I buy a couple 50-pound sacks of Play Sand, which can be added to the Sand Topping Mix to weaken it and make it more appropriate for shower floors.
The amount of water used in making deck mud will depend on the water content of the sand you use. If you are using a pre-mixed product like Sand Topping Mix the sand will be completely dry. Sharp sand or masonry sand, on the other hand, is stored outdoors, and its water content varies with the weather. In making deck mud you want to use only enough water to cause the cement coated sand particles to cling together when compressed in your hand. You will see no water when this occurs. The mix will merely be damp — just enough water to activate the cement and cause the hydration process to begin.
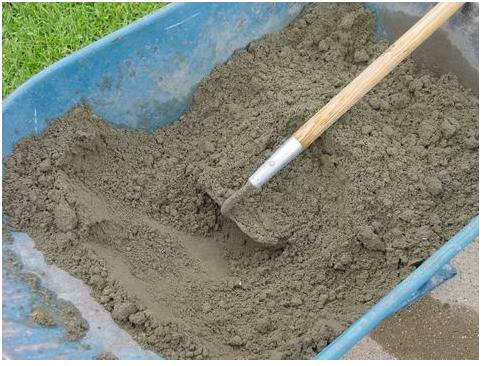
The mortar is made from 80 lbs. of Sand Topping Mix to which 50 lbs. of Play Sand
have been added. Water was added in small amounts until the mortar was dampened completely.
Whether using a pre-mixed product or sand and portland cement, it is important to dry mix the mortar before adding water. This ensures that each particle of sand becomes coated with cement. You can use a shovel, but a masonry hoe (above) works much better. A flat sand and gravel shovel works well when mixing on a flat surface such as a concrete slab or sheets of plywood. The idea is to shift the material back and forth until it’s completely blended.
Water is added only to the point that the mortar becomes evenly damp. You can see above the clumps that are created when water combines with the sand and cement. Continuing to mix the mortar will eliminate much of the clumping — unless the cement content is too rich.

The mortar is mixed. Note how it holds it’s shape when clumped in the hand. Note also that
there is no excess water. Look how relatively clean my hand remains after clumping the mud.
Handling the mud can be equated to making sandcastles, except that the mud will be a bit
dryer than sandcastle material.
The deck mud depicted above is ready to place and form. It is damp enough to hold itself together when packed but at the same time it contains no excess water. Water is what causes concrete and concrete products to shrink when curing. Deck mud is used because it shrinks very little. It is also much easier to work than mortars which contain more water, such as brick mortar, for example.

In this picture I have crushed the clump with my thumb. You can see how easily
the mortar crumbles. You can also easily see how dry the mix is. It’s unlike any other mortar
you might be familiar with.
When you pack the deck mud in your shower floor you will be able to rake it into the shape you want by using short pieces of wood as straightedges. That’s pretty much how shower floors are formed. The mortar is packed in with a wood float or flat steel trowel and rubbed or scraped off until the dish shape of the shower floor is attained. I’ve written books that contain instruction for building showers, and others have written articles on the subject, so I won’t cover that exercise here. This piece is intended only to give you a close-up look at properly mixed deck mud and a “feel” for how the material should act when you place it. I will say this, though. Don’t dilly dally around once the mud is mixed. Depending on temperature, humidity and wind conditions, you’ll have from 30 to 45 minutes to get the mud placed and shaped. Take longer than that and you’re pushing your luck.
To recap, deck mud is the mortar to use when building shower floors. Don’t let anyone tell you otherwise or sell you other cement products. Deck mud contains only sand, portland cement and a little bit of water.
Next time we will talk Waterproofing.
Stop by our store or give us a call @ 905-892-5756 and we will provide a free estimate.